Getting the Most From Your Heel Lift at Lower Heights — How to Split One Lift Into Two
There's a trick that most heel lift users never learn, and it matters if you need 6mm of elevation or less. (It also saves you money!)
Why Shorter Heights Need a Different Approach
The Clearly Adjustable lift is designed to be long — longer than most heel lifts on the market. That length is intentional. A lift that extends well forward under the arch supports the foot across its whole length, giving it a smooth ramp to rest on rather than a short wedge that leaves the arch unsupported and the foot tipping awkwardly toward the toes.
The technical term for what happens when a lift is too short is "bridging" — the foot spans a gap between the heel and the ball, with nothing supporting the arch in between. It feels uncomfortable and over time it stresses the arch. Longer is always better in heel lift design.
Now here's the problem with low heights. If you need 6mm or less of elevation, the standard approach — removing layers from the top of the lift — shortens the lift as you reduce its height. Each layer you peel off the top is one of the longer layers, so the lift gets both lower and shorter at the same time. By the time you're down to 6mm using this method, the lift is noticeably shorter than it started, and you're losing the arch support that made it work well in the first place.
The solution is to remove layers from the middle rather than all from the top — specifically, to separate the lift into alternating layers and re-stack them into two separate lifts. Each one ends up at half the original height, but retains the full original length. You get maximum arch support at a lower elevation, and as a bonus, one lift becomes two.
Making Two 6mm Lifts From One
This takes about five minutes the first time. Once you've done it, it's straightforward.
Step 1 — Separate all the layers Gently peel apart all the layers of the lift and lay them out in order. The lift has 14 layers total. Number them 1 through 14 from the top.
Step 2 — Divide into two alternating piles Sort the layers into two stacks:
Stack A: layers 1, 3, 5, 7, 9, 11, 13 (the odd-numbered layers)
Stack B: layers 2, 4, 6, 8, 10, 12, 14 (the even-numbered layers)
Each stack will have 7 layers — half the original count.
Step 3 — Re-stack each pile Work on a flat surface. Lay the bottom layer down, align the next layer on top of it matching the long edges and the rounded back end, and press gently. The layers will re-adhere to each other. Repeat until you have two complete lifts.
[Image: Two finished 6mm lifts side by side — insert diagram here]
The two finished lifts will look slightly different from each other because the layers alternate in their step pattern, but both will function identically. There will be a half-millimeter difference in the effective height at the center of the heel between the two — essentially imperceptible in practice.
Each lift now provides approximately 6mm of elevation at full original length. Both shoes are supported across the full arch. No bridging.
No lost comfort.
Going Even Lower — 4mm and Below
If you need less than 4mm of elevation — and want to maintain the longest possible lift length — take the alternating layer approach one step further by dividing into thirds rather than halves.
Instead of separating into odd and even layers, take every third layer to create three separate stacks:
Stack A: layers 1, 4, 7, 10, 13
Stack B: layers 2, 5, 8, 11, 14
Stack C: layers 3, 6, 9, 12 (one fewer layer — this lift will be fractionally lower than the other two)
Re-stack each pile as described above. Each finished lift will be approximately 4mm or slightly below, depending on which stack, and each retains close to the full original length.
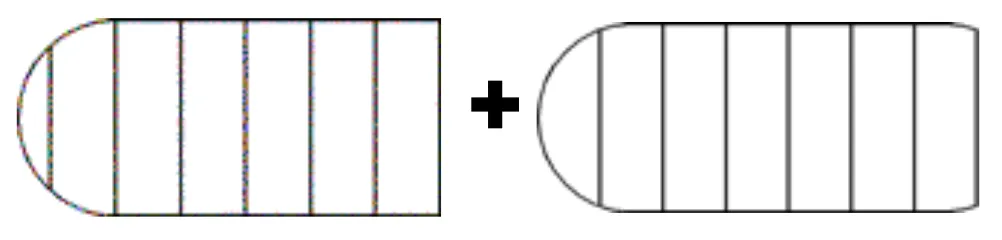
From there you can reduce any of the lifts further still by removing individual layers from the top if needed.
Fine-Tuning From Here
Once you have your split lifts at the base height you need, you can continue to adjust them the same way you would any Clearly Adjustable lift — remove a layer from the top to reduce by 1mm, replace one to add 1mm back. The same rules apply.
If you're using a split lift for leg length discrepancy at a low correction height, this technique gives you the full therapeutic benefit of a long supportive insert without the arch-unsupported feel that comes from a shortened lift. For Achilles tendon tapering at lower elevations, the same advantage applies.
You can also reduce the height of each of these lifts to less than 6mm by removing layers from the top. The two layers will differ slightly in their effective height under the center of the heel, by 1/2mm or about 1/50th of an inch.
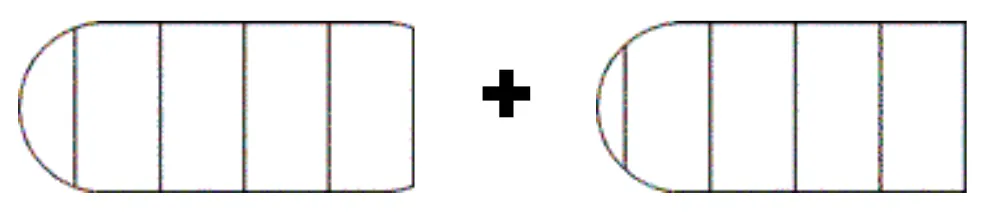
To keep the longest possible support at 4mm or less, use every third layer of the material to create two lifts that will look like these:
Disclaimer: This content has been compiled from clinical literature and reputable medical sources for educational purposes only. It is not a substitute for professional medical advice. Leg length discrepancy should always be evaluated and managed by a qualified healthcare provider.
Some content on this page has been updated using AI.
©2002–2026 Clearly Adjustable.